Pediatric Dental Trauma

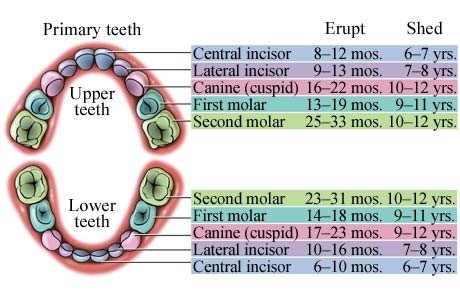
Traumatic dental injuries occur with great frequency in today’s children.  Reports show that 25% of school children experience dental trauma.  One of the most common dental injuries in baby teeth are luxation injuries, when the teeth is displaced.  Another common injury in permanent teeth is a fracture.  Today’s blog will discuss some of the common injuries in pediatric dental patients.

1) Soft tissue tear- The injury to the upper frenum, or tissue connecting the upper lip to the gingiva, is often torn on children at a young age when they are learning to walk.  This is a self-resolving injury, and rarely requires any treatment.  If this occurs, call you dentist as soon as possible to set up an exam to rule out any other potential injuries, and to discuss management.  Firm pressure with moist gauze of towel can help to stop bleeding in the area.  Soft and bland diet during the healing phase will help avoid any discomfort.  Good oral hygiene is still crucial, being gentle around this area.


2) Bumped teeth

       a) Concussion- Bumped tooth that is in the same place as before

       b) Luxation- Bumped tooth that is in a different place (see photo below)

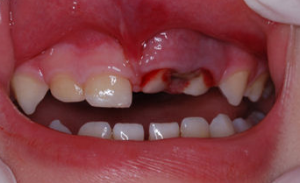
       c) Chipped tooth (See photo)

All of these injuries can be painful, and it important to see a dentist soon after the injury in order to properly manage the teeth to give the child’s teeth the best prognosis.  Sometimes, no treatment is needed, and the teeth are monitored.  Other times, treatment may be indicated to prevent any nerve damage and/or to place the teeth in the proper position. 

3)  Avulsion Injuries (knocked out teeth)-

a) Baby Tooth- If a baby tooth is knocked out, do not attempt to re-implant the tooth. Call your dentist as soon as possible to have your child seen. Weighing the risks and benefits of re-implanting the tooth or leaving it out, the best option is to leave the tooth out of the mouth in order to protect the underlying permanent tooth from damage.

b) Permanent Tooth- *Call a dentist immediately to arrange for care*

Here are the proper steps to manage a permanent tooth that has been knocked out.

After getting a hold of a dentist immediately, follow the steps below:

1) Pending the injury, rule out any potential head damage that would require immediate emergent hospital treatment.  If the child is unconscious, vomiting, has memory loss, is lethargic, it may indicate there are other more serious problems than the tooth. 

2) Find the tooth, and pick it up by the crown (not the root, see photo).

3) Rinse the tooth gently and briefly (10 seconds) with cold tap water

4) Do not scrub the tooth, do not clean the tooth with soap, alcohol, mouthwash or any other chemical

5) Do not wrap the tooth in tissue, cloth or plastic

6) Do not allow the tooth to dry

7) Place the tooth back into socket immediately and with gentle finger pressure (Best chance of saving the tooth). If you are not comfortable with this, that is OK. Getting to a dentist as soon as possible is crucial to give the tooth the best prognosis.

8) If unable to place the tooth back into its socket, transport the tooth in the following liquids listed in order of preference:

       i) Hanks Balanced Salt Solution (Save-A-Tooth®); sometimes found in first aid kits (tooth may be kept in this solution up to 24 hours) http://www.save-a-tooth.com/

       ii) Milk:  preferably cold and low fat (tooth may be kept in milk up to 3 hours)

       iii) Cold tap water or inside the child’s mouth (last resort – living cells on tooth may completely die within 1 hour)

GET TO A DENTIST AS SOON AS POSSIBLE! The sooner the tooth is placed back in the socket, the better chance the tooth has of surviving long term.


We hope this blog was informational and helpful. Please contact our office at 605-242-4700 with any questions or concerns. Thanks for reading!

Dental Timeline for a Growing Child

The American Academy of Pediatric Dentistry recommends that every child have a dental home established, along with a dental exam by the age of 1. The reason is for proper education and establishment of a prevention protocol. Studies are showing that early care is leading to improved prevention for children, resulting in less problems with their teeth as they get older.

AGE 0-6 Months: Edentulous Stage

  • Wipe down your child’s mouth with a damp cloth after feedings, even when no teeth are present. It is especially important to cleanse their mouths before bedtime.
  • Pacifier/Thumb/Finger sucking habits- It is normal for infants to have one of these habits. Sometimes, it can cause damage to teeth and cause jaw discrepancies if these habits persist long term. 
  • Do NOT have your child go to bed with a bottle in his/her mouth

  • Avoid sharing utensils and drinks with young children due to spread of oral bacteria that can cause cavities.

AGE 6 months-1 Year: Primary teeth or Baby dentition

  • The first baby tooth normally appears at about 6 months. Some children get teeth early, and some children don’t get their first tooth until 1 year.

  • Establish a dental home and have your child’s teeth and/or gums examined by one year of age

  • Per the AAP (American Academy of Pediatrics), transitioning to a regular cup should occur by age 1. If your child has juice, it should be limited to 4-6 ounces per day, at meal time, drank out of a regular cup

  • Spacing between teeth is normal and good

  • Teeth often erupt “crooked” and normally straighten out over time

  • Brush teeth as soon as they erupt, and brush everywhere along the gum line

AGE 1-5 Years: Primary dentition

  • Normally, the last baby teeth to erupt are the 2nd molars, which erupt around age 2

  • Flossing should be implemented when the teeth start to touch, and is very important between the back molars to prevent cavities occurring between the teeth

  • Dental x-rays help visualize between teeth to assess for cavities, but depending on the child’s cooperation level, may not be recorded until they are 3 or 4 years old

  • Tooth grinding is very common, and normally no treatment is recommended.

  • If your child cannot spit, then a smear of fluoridated toothpaste should be used to minimize swallowing. Once your child can spit, a pea sized amount can be used

Age 6-12 Years: Mixed dentition

  • Loss of the first baby tooth normally occurs around age 6 or 7

  • Tenderness when chewing is common when teeth are loose

  • We recommend for the children to wiggle their teeth when they get loose

  • Sometimes, baby teeth do not get loose on their own, and permanent teeth can start to erupt. If this occurs, contact your dentist to see if extraction is indicated.

  • Sealants are recommended when the permanent first molars are erupted
  • A panoramic x-ray to assess oral structures and tooth growth and development
  • Consider mouth guards for children playing sports

Age 13-18: Permanent Dentition

  • Sealants on 2nd molars are recommended (normally erupt around age 12)

  • Flossing and starting good habits is crucial at this age, as good (and bad) habits will carry into adulthood

  • Orthodontic treatment is normally performed in this stage, although some children are seen for orthodontics as early as age 6-7 depending on the orthodontic problem

  • Diet should be monitored closely, especially consumption of sugary drinks such as Gatorade, energy drinks, pop, and juice

  • Hormonal changes during puberty can affect oral health, and proper oral hygiene becomes even more crucial

  • Wisdom teeth should be evaluated throughout this stage for potential extraction to minimize risks and to improve healing time

Brushing & Flossing

Another frequently asked question we have is about brushing and flossing. When should we start brushing our child’s teeth? How long until they can brush unsupervised? When should we start flossing? What is the proper technique for brushing and flossing?  This blog will answer those questions and provide you with pictures and videos to help improve your knowledge in this area.

BRUSHING:

1) When should we start brushing our child’s teeth? Should we use toothpaste with fluoride?  The American Academy of Pediatric Dentistry recommends twice daily brushing with fluoridated toothpaste for all children, once the first tooth erupts.  Before the first tooth erupts, parents can use infant toothbrushes or washcloths to clean the child’s gingiva.  Once the teeth erupt, a smear or rice sized amount of fluoridated toothpaste is used for kids less than 3, and a pea sized for kids 3-6.  To maximize the beneficial effect of fluoride, rinsing after brushing should be kept to a minimum. No eating or drinking should occur after brushing before the child goes to bed.  For children we cannot yet spit, some parents have concern for potential swallowing of fluoride.  The amount of fluoride that could be ingested with a smear is minimal, and will have no harm on your child’s health, while the benefits of the fluoride on the teeth are immense!  If you do not feel comfortable with this, “Toddler” toothpaste with no fluoride is a good alternative to get your child used to the feeling of toothpaste.

Children should be directly supervised with a parent watching and helping brush properly until the child is around 8 years old.  The AAPD recommends twice daily brushing, for at least 2 minutes each time. 

2) What is the proper technique for brushing?  As shown below, the bristles of the toothbrush should brush the teeth and the gums, turning the gums white, referred to as “blanching.”  This will clean the teeth and remove the plaque and bacteria that lives under the gumline.

3) What if my child is uncooperative? 

Talk about positive reinforcement. If it’s cold, you put on a jacket.  Brushing is an essential part of our oral health and overall health, which we all want for our children. We cannot get lax, we need to establish good oral hygiene habits when they are young, so they continue throughout the child’s lifetime, keeping their teeth happy and healthy.

Shown below are some safe and efficient positions to help brush a child’s teeth who may not want to. It is important to be able to visualize the teeth and properly move the lip in order to brush those hard to reach places on a young child.

FLOSSING:

Flossing should occur when there are no spaces between teeth, and you cannot visualize in between the teeth. The photo below shows good spacing, so it would not be necessary to floss this child’s teeth.  There is still plaque that can live below the gums in between the teeth, but good brushing in these areas should remove this plaque.

This photo shows no spacing.

This photo shows no spacing.

this illustrates the best way to floss.

this illustrates the best way to floss.

1)     Use about 18 inches of floss

2)     Wrap each end of floss around your middle fingers, then being able to use your index fingers and thumbs for good control

3)     Slide gently between the contacts of two teeth. Creating a “C” shape to the floss, pull the floss against one of the teeth, and gently slide up and down below the gumline, holding the floss against one of the teeth. Repeat for the other tooth. 

4)     Repeat this for all the teeth that are contacting, using the “C” shape for each tooth, and gently sliding up and down below the gumline. You should not be hitting your gums excessively. If your gums bleed, it could indicate inflamed gums, which can heal over time of good hygiene.  Sometimes, bleeding when flossing could be caused my improper technique. Please contact us with any questions regarding proper brushing and flossing.

Thank you for reading today’s blog!  We hope this helps to improve your child’s oral health.  Please comment or send us a message with any further questions.